Difference between revisions of "Evaluator user manual"
(→Create comparison report) |
(→Reevaluation request) |
||
| (66 intermediate revisions by 2 users not shown) | |||
| Line 1: | Line 1: | ||
| − | |||
| − | |||
| − | |||
=='''Introduction'''== | =='''Introduction'''== | ||
TQAuditor is the system that '''evaluates and monitors translation quality''' and allows you to: | TQAuditor is the system that '''evaluates and monitors translation quality''' and allows you to: | ||
| − | *'''compare''' unedited translation made by a translator with edited version received from an editor; | + | *'''compare''' unedited translation made by a translator with an edited version received from an editor; |
*'''generate a report''' about editor’s corrections; | *'''generate a report''' about editor’s corrections; | ||
| − | *'''classify''' each correction by mistake type and severity, thus allowing to get the translation quality evaluation score | + | *'''classify''' each correction by a mistake type and severity, thus allowing to get the translation quality evaluation score; |
*ensure '''anonymous communication''' between a translator and an editor regarding corrections and mistakes classification; | *ensure '''anonymous communication''' between a translator and an editor regarding corrections and mistakes classification; | ||
*'''automate a process''' of maintaining the evaluation project; | *'''automate a process''' of maintaining the evaluation project; | ||
| + | |||
| + | The evaluator's role is to assess the quality of a translation. To do it, they compare two versions of a translated file, add mistakes and classify them by type and severity. | ||
| + | Once the evaluation is completed, the evaluator generates a report regarding the quality of the translation. | ||
=='''How to accept invitation'''== | =='''How to accept invitation'''== | ||
| Line 28: | Line 28: | ||
[[File:Evaluator registration2.png|border|800px]] | [[File:Evaluator registration2.png|border|800px]] | ||
| − | Choose your | + | Choose your username and password, confirm the password, accept the Privacy policy and Terms of service (to read them, click the corresponding links highlighted in blue), and click "Submit". |
4. Your account will be created. | 4. Your account will be created. | ||
| Line 38: | Line 38: | ||
[[File:Evaluator profile1.png|border|1000px]] | [[File:Evaluator profile1.png|border|1000px]] | ||
| − | *'''Quick compare''' — here you can compare two versions of translated files in the system. | + | *'''Quick compare''' — here, you can compare two versions of translated files in the system. |
| − | *'''Projects''' — here you can find the list of projects. | + | *'''Projects''' — here, you can find the list of projects. |
| − | *'''Reports''' — here you can find your reports. | + | *'''Reports''' — here, you can find your reports. |
| − | *'''System''' — here you can find the | + | *'''System''' — here, you can find the quality standard of the company you cooperate with. |
==='''Profile settings'''=== | ==='''Profile settings'''=== | ||
| − | On the | + | On the "My Profile" page, you can update your personal information and change your password. |
| − | To do so, go to the | + | To do so, go to the "My profile" menu: |
[[File:Profile settings1.png|border|1000px]] | [[File:Profile settings1.png|border|1000px]] | ||
| Line 66: | Line 66: | ||
[[File:Compare.png|border|300px]] | [[File:Compare.png|border|300px]] | ||
| − | The comparison report will be created, where you can see the editor’s amendments highlighted with color | + | The [https://wiki.tqauditor.com/wiki/Comparison_report comparison report] will be created, where you can see the editor’s amendments highlighted with color and different filters to simplify your work. |
=='''Projects'''== | =='''Projects'''== | ||
| − | On the "Projects" page, you can find the list of projects that you have been assigned as | + | On the "Projects" page, you can find the list of projects that you have been assigned as the evaluator. |
Click on the project's ID to open a project: | Click on the project's ID to open a project: | ||
| Line 76: | Line 76: | ||
[[File:Projects list1.2.png|border|1000px]] | [[File:Projects list1.2.png|border|1000px]] | ||
| − | ===''' | + | ==='''Filters'''=== |
| − | + | You may order projects by particular criteria: click the title of any column highlighted in blue, and all the projects will line up (the arrow [[file:Line up arrow.jpg|border|25px]] button appears). | |
| − | [[File: | + | [[File:2 project filters.png|1000px]] |
| − | |||
| − | + | Also, you may find additional filters here: | |
| − | + | [[File:1 project filter.png|250px]] | |
| − | + | *Is overdue — the system will display the overdue projects only. | |
| − | + | *Stage — tick one of the checkboxes, and the system will display only projects at a particular stage. | |
| − | + | *Project code — the system will display projects with the specified project code. | |
| − | + | *Translation job code — the system will display the projects with a particular translation job ID entered by the manager. | |
| − | + | *Review job code — the system will display the projects with a particular review job ID entered by the manager (differs from translation job code). | |
| − | + | *Project name — the system will display the projects with the specified name. | |
| − | + | *Specialization — the system will display the projects with a particular translation specialization. | |
| − | + | *Service — the system will display the projects with a particular service. | |
| − | + | *Evaluation count — the system will display projects with the specified evaluation count. | |
| − | + | *Manager — the system will display the projects assigned to a particular manager. | |
| − | + | *Creation date — the system will display the projects created within the specified dates. | |
| − | |||
| − | + | ==='''Project details'''=== | |
| − | + | Once you've been assigned the project, you can see general information, a project manager, and their email: | |
| − | + | [[File:Project details1.2.png|1000px]] | |
| + | [[File:Project details2.1.png|1000px]] | ||
| − | + | ==='''Upload files'''=== | |
| − | + | First, you have to upload files. Press the "Upload files" button to do it: | |
| − | + | [[File:Upload files1.png|1000px]] | |
| − | + | Press the "Choose files" button to select two versions of a translated file: | |
| − | + | [[File:Upload files3.png|600px]] | |
| − | + | ::<span style="color:orange">'''Note:'''</span> the evaluator is the only user who can upload files. | |
| − | + | ==='''Create comparison report'''=== | |
| − | + | Once you have uploaded files, you can create the comparison report. Press the "Create comparison report" button: | |
| − | + | [[File:Upload files2.1.png|border|250px]] | |
| − | + | When the comparison report is generated, you will see time limits details, the comparison of the original and reviewed translation, markup display settings, and comparison details: | |
| − | + | [[File:Comparison report1.1.png|border|1000px]] | |
| − | + | For more information, please check the [https://wiki.tqauditor.com/wiki/Comparison_report "Comparison report"] page. | |
=='''Start evaluation'''== | =='''Start evaluation'''== | ||
| Line 144: | Line 143: | ||
Once files are uploaded and the comparison report is created, you can start an evaluation by selecting whether an automatic or manual word count. | Once files are uploaded and the comparison report is created, you can start an evaluation by selecting whether an automatic or manual word count. | ||
| − | The automatic word count is used for fully reviewed files and the manual word count is used for partially reviewed files. You can read more on the differences between the two types of word count and how to use them on [https://wiki.tqauditor.com/wiki/Frequently_Asked_Questions#Automatic_vs._manual_word_count this page]. | + | The automatic word count is used for fully reviewed files, and the manual word count is used for partially reviewed files. You can read more on the differences between the two types of word count and how to use them on [https://wiki.tqauditor.com/wiki/Frequently_Asked_Questions#Automatic_vs._manual_word_count this page]. |
==='''Evaluation with automatic word count'''=== | ==='''Evaluation with automatic word count'''=== | ||
| − | To start the evaluation with the automatic word count, press | + | To start the evaluation with the automatic word count, press "Start evaluation (automatic word count)": |
[[File:Evaluation automatic word count1.png|border|250px]] | [[File:Evaluation automatic word count1.png|border|250px]] | ||
| Line 154: | Line 153: | ||
You can also adjust evaluation settings: | You can also adjust evaluation settings: | ||
| − | *Skip | + | *Skip repetitions — the system will hide repeated segments (only one of them will be displayed) |
| − | *Skip | + | *Skip locked units — the "frozen" units will not be displayed (for example, this setting is used if a client wants some important parts of the translated text to stay unchanged). |
| − | *Skip segments with match — | + | *"Skip segments with match >=" — units with matches greater than or equal to a specified number will not be displayed. |
| − | *Evaluation sample word count limit — | + | *Evaluation sample word count limit — this value is used to adjust how many segments for evaluation will be displayed. |
Press the "Start evaluation" button once settings are adjusted: | Press the "Start evaluation" button once settings are adjusted: | ||
| Line 166: | Line 165: | ||
[[File:Evaluation automatic word count2.2.png|border|1000px]] | [[File:Evaluation automatic word count2.2.png|border|1000px]] | ||
| − | Now you have to | + | ==='''Evaluation with manual word count'''=== |
| + | |||
| + | To start the evaluation with the manual word count, press "Start evaluation (manual word count)": | ||
| + | |||
| + | [[File:Start evaluation1.1.png|border|250px]] | ||
| + | |||
| + | Enter the number of evaluated source words and press the "Start evaluation" button: | ||
| + | |||
| + | [[File:Start evaluation manual word count1+.png|border|1000px]] | ||
| + | |||
| + | ::<span style="color:orange">'''Note:'''</span> Please take into account that the "Evaluated source words" should reflect the total number of words in the reviewed part of the file. You can read more on how to use the manual word count on [https://wiki.tqauditor.com/wiki/Frequently_Asked_Questions#Automatic_vs._manual_word_count this page]. | ||
| + | |||
| + | ==='''Quality evaluation'''=== | ||
| + | |||
| + | Once you have started the evaluation, you can find the evaluation report by clicking the corresponding button: | ||
| + | |||
| + | [[File:Evaluation automatic word count3.png|1000px]] | ||
| + | |||
| + | Now you have to start adding mistakes. Click the "Add mistake" button within a needed segment to add a mistake: | ||
[[File:1. 91.png|border|800px]] | [[File:1. 91.png|border|800px]] | ||
| − | + | Specify each mistake's type and severity, leave a comment if needed, and click "Submit": | |
[[File:2. mistake.png|border|280px]] | [[File:2. mistake.png|border|280px]] | ||
| − | You can edit, delete mistake/comment or add | + | You can edit, delete mistake/comment or add mistakes by clicking the corresponding buttons: |
[[File:3. mistal.png|border|800px]] | [[File:3. mistal.png|border|800px]] | ||
| − | When the | + | When all the mistakes are added and classified, click "Complete evaluation", write an evaluation summary, and press the "Complete" button. The system will send the quality assessment report to the translator. |
| − | |||
| − | The system will send the quality assessment report to the translator. | ||
Please note that you may '''<U>[[Evaluation report#Export to Excel|export the evaluation report]]</U>''' with mistakes classification. | Please note that you may '''<U>[[Evaluation report#Export to Excel|export the evaluation report]]</U>''' with mistakes classification. | ||
| − | |||
| − | |||
==='''Reevaluation request'''=== | ==='''Reevaluation request'''=== | ||
| Line 192: | Line 205: | ||
[[File:Reevaluation1.png|border|800px]] | [[File:Reevaluation1.png|border|800px]] | ||
| − | Click on the project ID, and it will bring you to the "Project details" page. Next, press the "Evaluation report" button and start reevaluation: | + | Click on the project ID, and it will bring you to the "Project details" page. Next, press the "Evaluation report" button and start the reevaluation: |
[[File:Reevaluation2.png|border|250px]] | [[File:Reevaluation2.png|border|250px]] | ||
| Line 200: | Line 213: | ||
[[File:Reevaluation3.png|border|1000px]] | [[File:Reevaluation3.png|border|1000px]] | ||
| − | ::<span style="color: | + | ::<span style="color:orange">'''Note:'''</span> in order to do the reevaluation you have to reply to all the comments left by the translator. |
You can also select a "Last commented by translator" option so that you see units with the translator's comments first: | You can also select a "Last commented by translator" option so that you see units with the translator's comments first: | ||
| Line 214: | Line 227: | ||
[[File:Arbitration1+.png|border|300px]] | [[File:Arbitration1+.png|border|300px]] | ||
| − | You'll also receive an email notification when the project | + | You'll also receive an email notification when the arbiter completes the project. Follow the project ID link to see the changes: |
| − | [[File:Arbitration2.png|border| | + | [[File:Arbitration2.png|border|600px]] |
=='''Reports'''== | =='''Reports'''== | ||
| Line 285: | Line 298: | ||
[[File:Reports8.png|border|1000px]] | [[File:Reports8.png|border|1000px]] | ||
| + | |||
| + | ==='''Filters'''=== | ||
| + | |||
| + | Уou can specify the project creation date range using the filter: | ||
| + | |||
| + | [[File:Report filters.png|250px]] | ||
=='''Quality standard'''== | =='''Quality standard'''== | ||
| Line 294: | Line 313: | ||
Here you can find: | Here you can find: | ||
| − | * Score limit and | + | * Score limit and mistake severities: |
[[File:1 m.png|border|200px]] | [[File:1 m.png|border|200px]] | ||
| Line 309: | Line 328: | ||
[[File:M4.png|border|250px]] | [[File:M4.png|border|250px]] | ||
| − | |||
| − | |||
| − | |||
| − | |||
| − | |||
| − | |||
| − | |||
| − | |||
| − | |||
| − | |||
| − | |||
| − | |||
| − | |||
| − | |||
| − | |||
| − | |||
| − | |||
| − | |||
| − | |||
| − | |||
| − | |||
| − | |||
| − | |||
| − | |||
| − | |||
| − | |||
| − | |||
| − | |||
| − | |||
| − | |||
| − | |||
| − | |||
| − | |||
| − | |||
| − | |||
| − | |||
| − | |||
| − | |||
| − | |||
| − | |||
| − | |||
| − | |||
| − | |||
| − | |||
| − | |||
Latest revision as of 15:15, 12 July 2022
Contents
Introduction
TQAuditor is the system that evaluates and monitors translation quality and allows you to:
- compare unedited translation made by a translator with an edited version received from an editor;
- generate a report about editor’s corrections;
- classify each correction by a mistake type and severity, thus allowing to get the translation quality evaluation score;
- ensure anonymous communication between a translator and an editor regarding corrections and mistakes classification;
- automate a process of maintaining the evaluation project;
The evaluator's role is to assess the quality of a translation. To do it, they compare two versions of a translated file, add mistakes and classify them by type and severity. Once the evaluation is completed, the evaluator generates a report regarding the quality of the translation.
How to accept invitation
1. The translation agency you cooperate with adds your account into the system. You receive an invitation email.
2. Accept the invitation by clicking the link in the received letter:
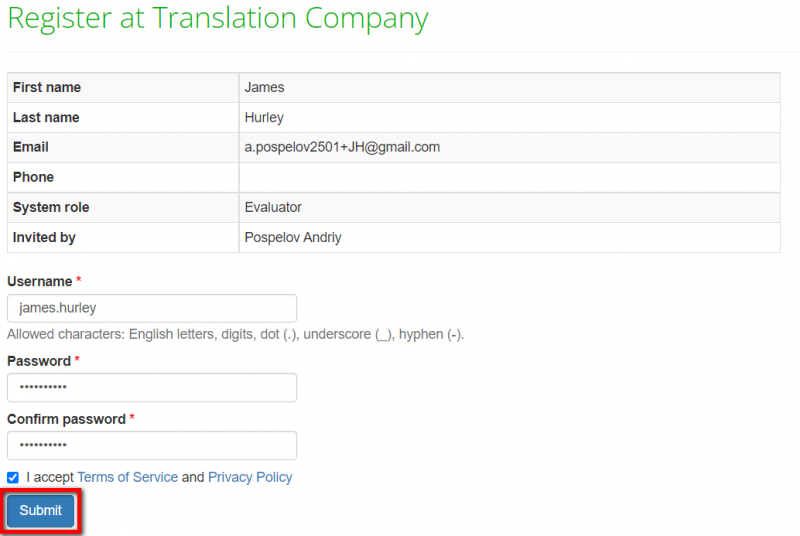
3. The following window appears:
Choose your username and password, confirm the password, accept the Privacy policy and Terms of service (to read them, click the corresponding links highlighted in blue), and click "Submit".
4. Your account will be created.
Get started with an evaluator account
There are several main menus the evaluator has access to:
- Quick compare — here, you can compare two versions of translated files in the system.
- Projects — here, you can find the list of projects.
- Reports — here, you can find your reports.
- System — here, you can find the quality standard of the company you cooperate with.
Profile settings
On the "My Profile" page, you can update your personal information and change your password.
To do so, go to the "My profile" menu:
Quick compare
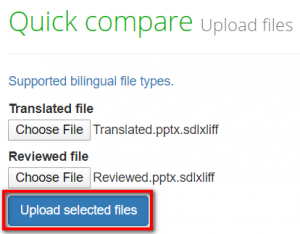
You can compare two versions of translated files in the system. Press the "Quick compare" button to do it:
Click "Supported bilingual file types" to see the file formats TQA work with.
Press the "Upload selected files" button:
The comparison report will be created, where you can see the editor’s amendments highlighted with color and different filters to simplify your work.
Projects
On the "Projects" page, you can find the list of projects that you have been assigned as the evaluator.
Click on the project's ID to open a project:
Filters
You may order projects by particular criteria: click the title of any column highlighted in blue, and all the projects will line up (the arrow ![]() button appears).
button appears).
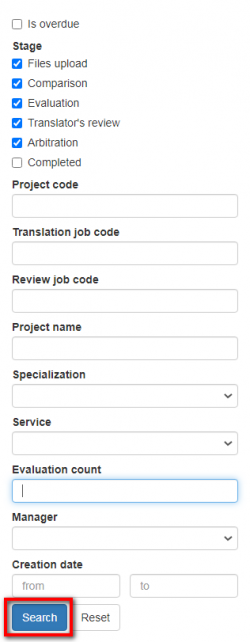
Also, you may find additional filters here:
- Is overdue — the system will display the overdue projects only.
- Stage — tick one of the checkboxes, and the system will display only projects at a particular stage.
- Project code — the system will display projects with the specified project code.
- Translation job code — the system will display the projects with a particular translation job ID entered by the manager.
- Review job code — the system will display the projects with a particular review job ID entered by the manager (differs from translation job code).
- Project name — the system will display the projects with the specified name.
- Specialization — the system will display the projects with a particular translation specialization.
- Service — the system will display the projects with a particular service.
- Evaluation count — the system will display projects with the specified evaluation count.
- Manager — the system will display the projects assigned to a particular manager.
- Creation date — the system will display the projects created within the specified dates.
Project details
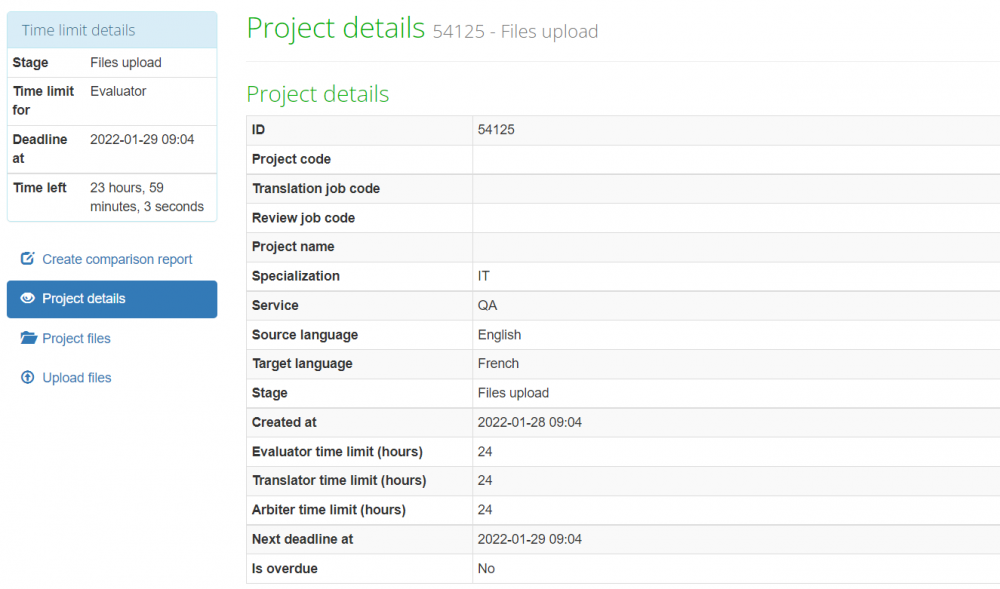
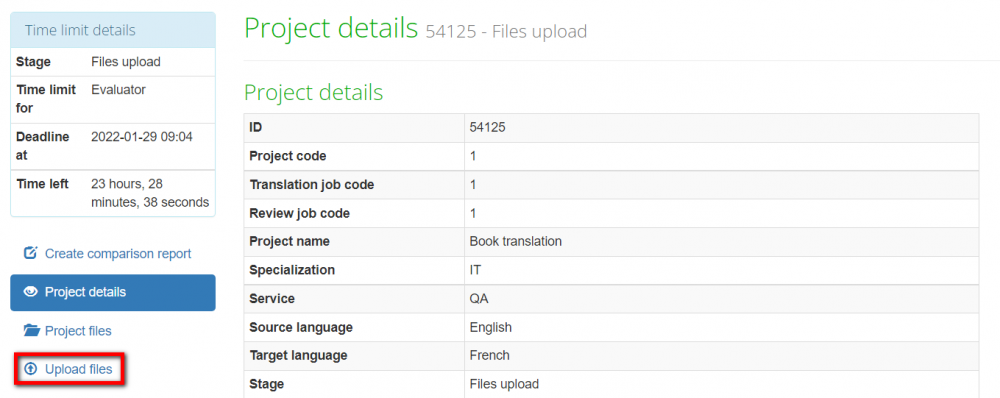
Once you've been assigned the project, you can see general information, a project manager, and their email:
Upload files
First, you have to upload files. Press the "Upload files" button to do it:
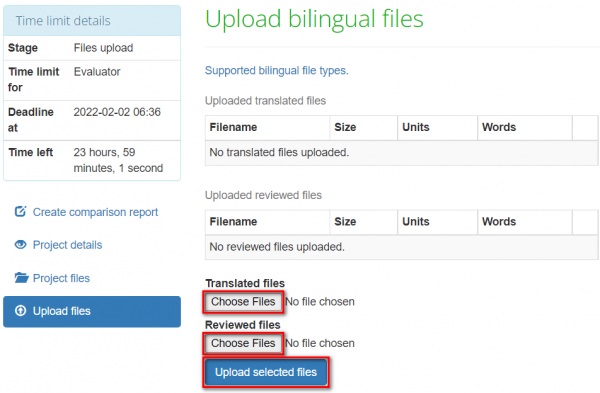
Press the "Choose files" button to select two versions of a translated file:
- Note: the evaluator is the only user who can upload files.
Create comparison report
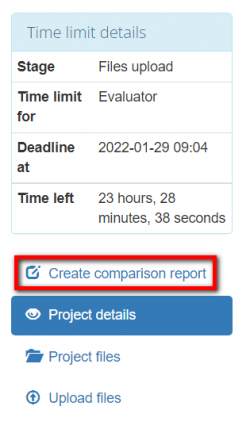
Once you have uploaded files, you can create the comparison report. Press the "Create comparison report" button:
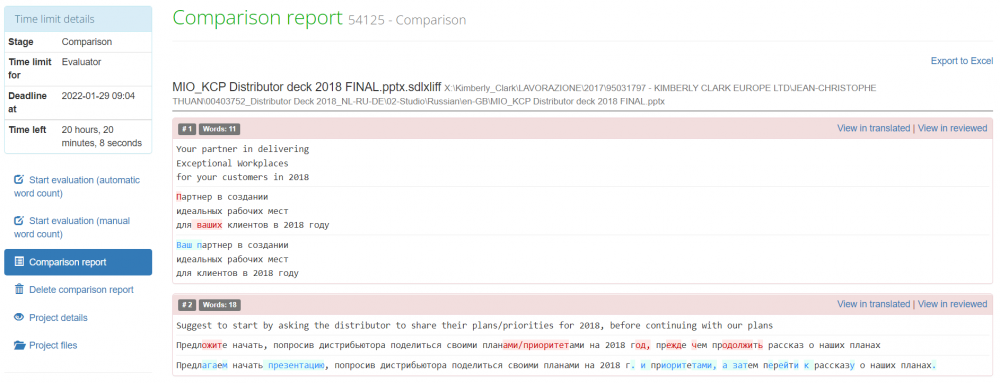
When the comparison report is generated, you will see time limits details, the comparison of the original and reviewed translation, markup display settings, and comparison details:
For more information, please check the "Comparison report" page.
Start evaluation
Once files are uploaded and the comparison report is created, you can start an evaluation by selecting whether an automatic or manual word count.
The automatic word count is used for fully reviewed files, and the manual word count is used for partially reviewed files. You can read more on the differences between the two types of word count and how to use them on this page.
Evaluation with automatic word count
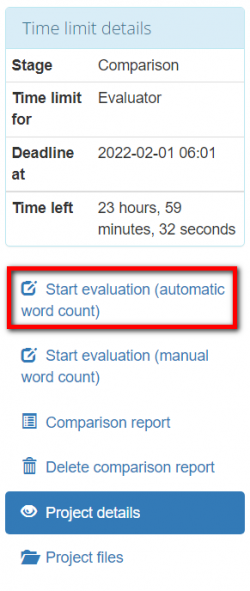
To start the evaluation with the automatic word count, press "Start evaluation (automatic word count)":
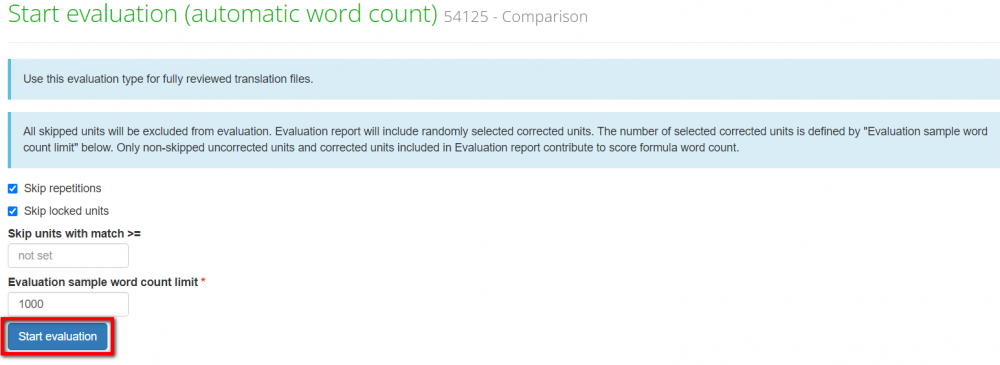
You can also adjust evaluation settings:
- Skip repetitions — the system will hide repeated segments (only one of them will be displayed)
- Skip locked units — the "frozen" units will not be displayed (for example, this setting is used if a client wants some important parts of the translated text to stay unchanged).
- "Skip segments with match >=" — units with matches greater than or equal to a specified number will not be displayed.
- Evaluation sample word count limit — this value is used to adjust how many segments for evaluation will be displayed.
Press the "Start evaluation" button once settings are adjusted:
Evaluation with manual word count
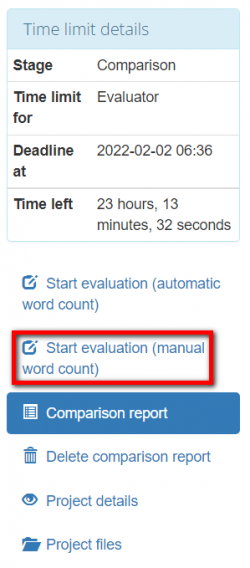
To start the evaluation with the manual word count, press "Start evaluation (manual word count)":
Enter the number of evaluated source words and press the "Start evaluation" button:
- Note: Please take into account that the "Evaluated source words" should reflect the total number of words in the reviewed part of the file. You can read more on how to use the manual word count on this page.
Quality evaluation
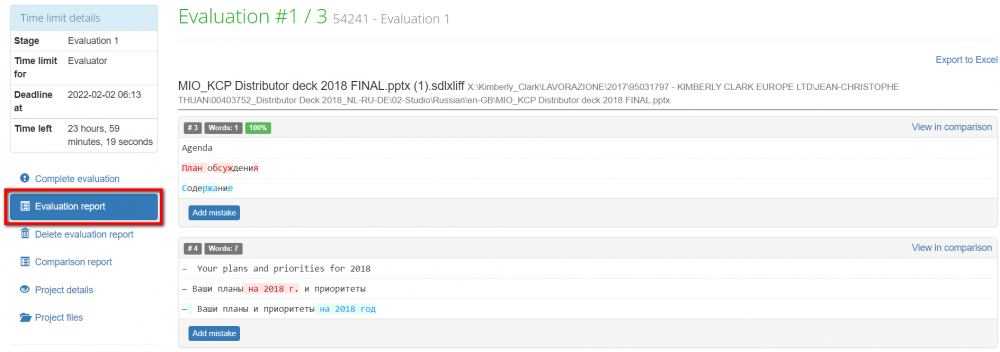
Once you have started the evaluation, you can find the evaluation report by clicking the corresponding button:
Now you have to start adding mistakes. Click the "Add mistake" button within a needed segment to add a mistake:
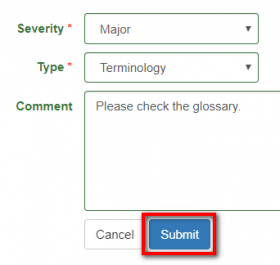
Specify each mistake's type and severity, leave a comment if needed, and click "Submit":
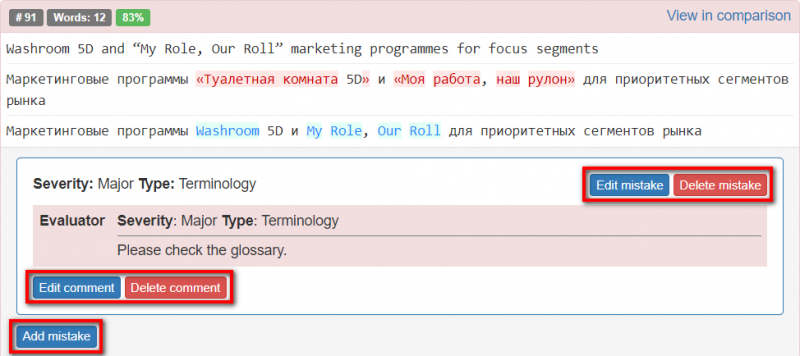
You can edit, delete mistake/comment or add mistakes by clicking the corresponding buttons:
When all the mistakes are added and classified, click "Complete evaluation", write an evaluation summary, and press the "Complete" button. The system will send the quality assessment report to the translator.
Please note that you may export the evaluation report with mistakes classification.
Reevaluation request
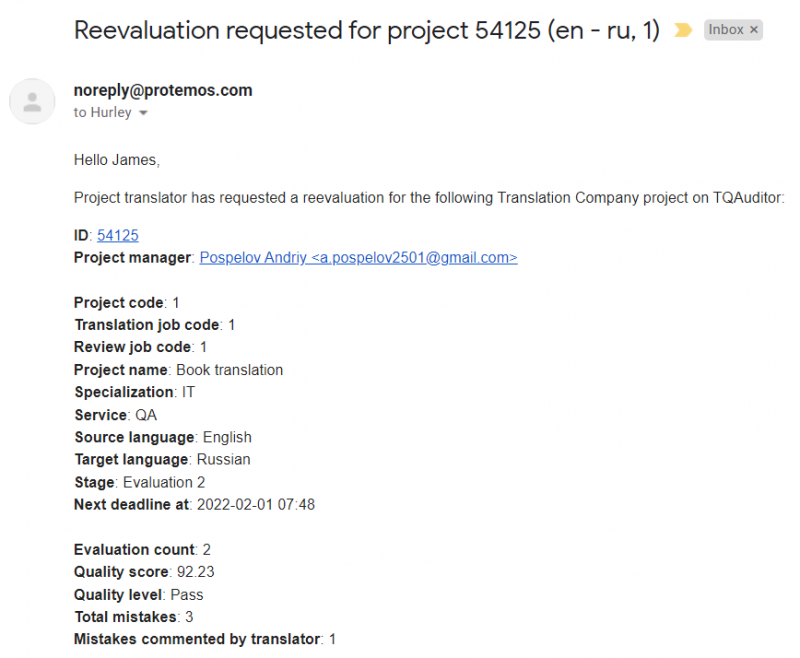
If the translator has requested a reevaluation, you will receive a corresponding email notification:
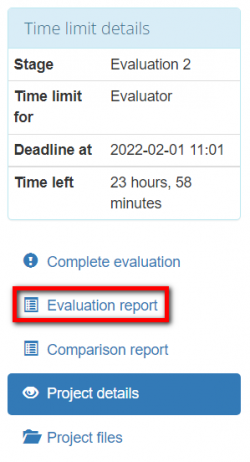
Click on the project ID, and it will bring you to the "Project details" page. Next, press the "Evaluation report" button and start the reevaluation:
Press the "Add comment" button to reply to the translator's comment:
- Note: in order to do the reevaluation you have to reply to all the comments left by the translator.
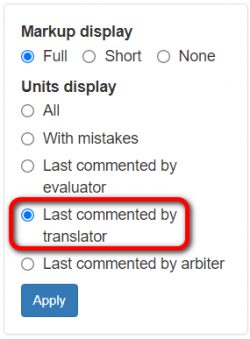
You can also select a "Last commented by translator" option so that you see units with the translator's comments first:
Once done, click "Complete evaluation", edit an evaluation summary if needed, and press the "Complete" button.
Arbitration request
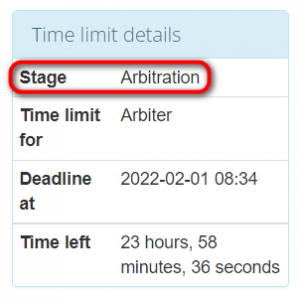
If there is still no agreement regarding the severity of mistakes, the translator can request arbitration. The arbiter will provide a final score that cannot be disputed. The stage of the project will change accordingly:
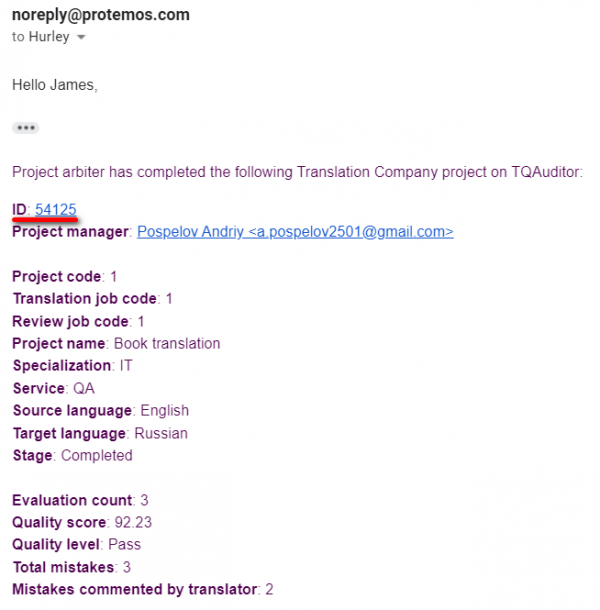
You'll also receive an email notification when the arbiter completes the project. Follow the project ID link to see the changes:
Reports
Since the evaluator can also be assigned to a project as the translator, you can check both the translator and evaluator reports.
Translator reports
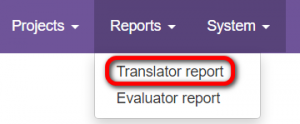
To check your translator reports, go to "Reports" —> "Translator report".
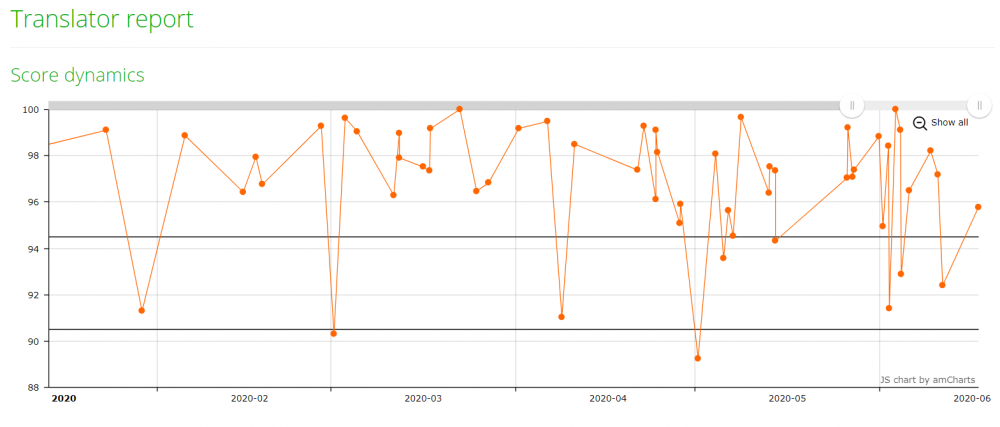
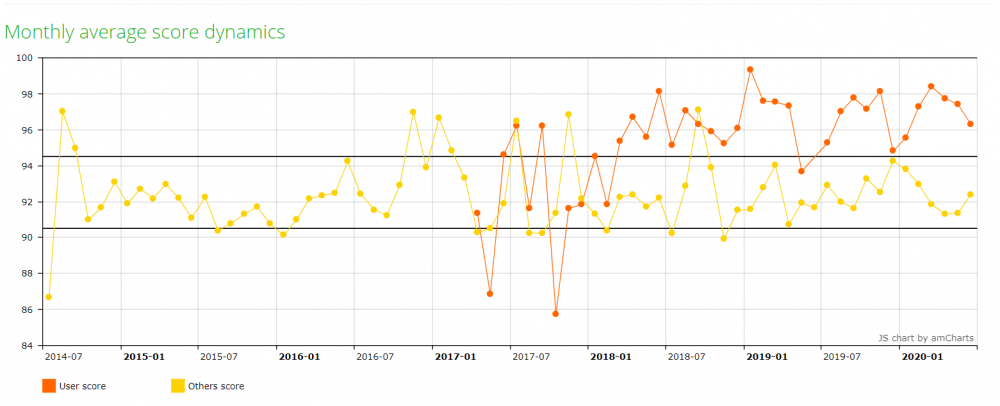
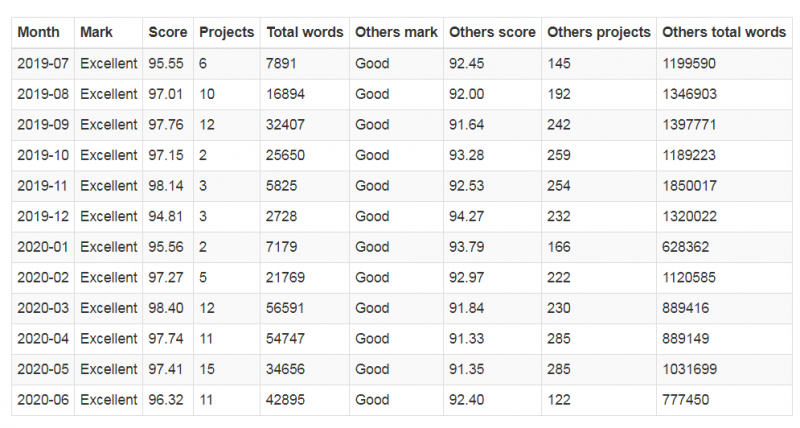
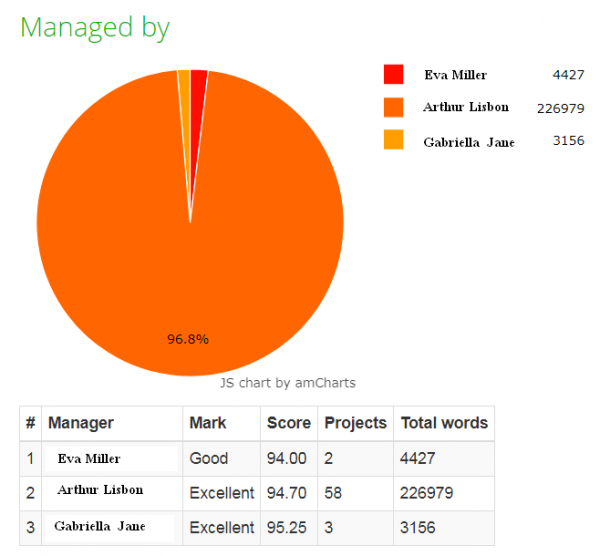
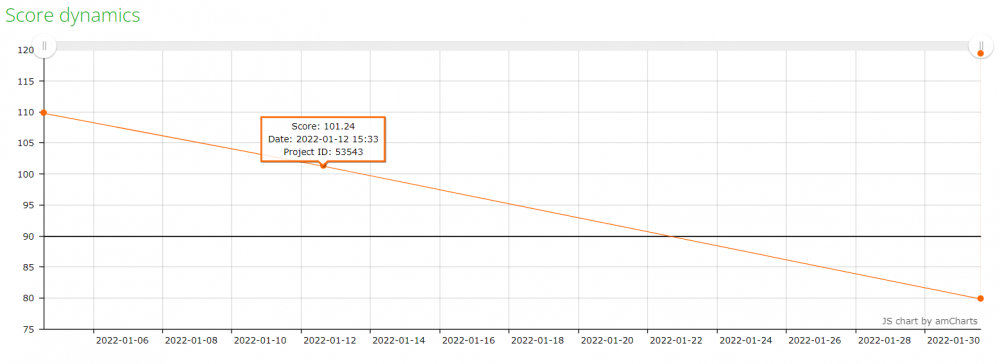
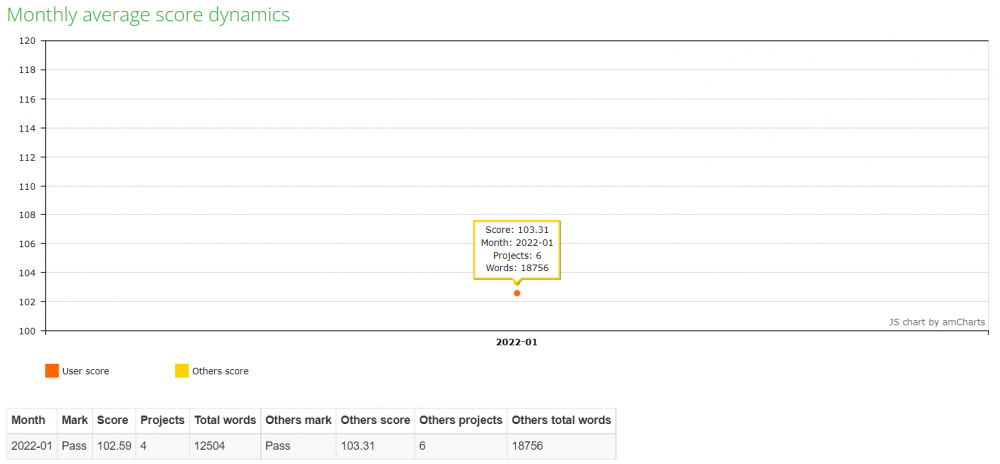
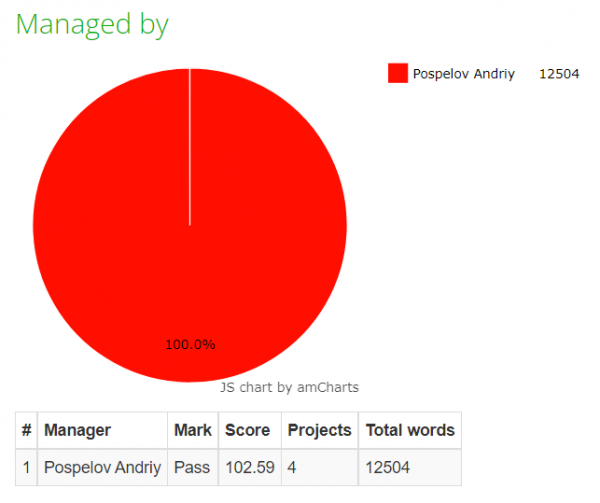
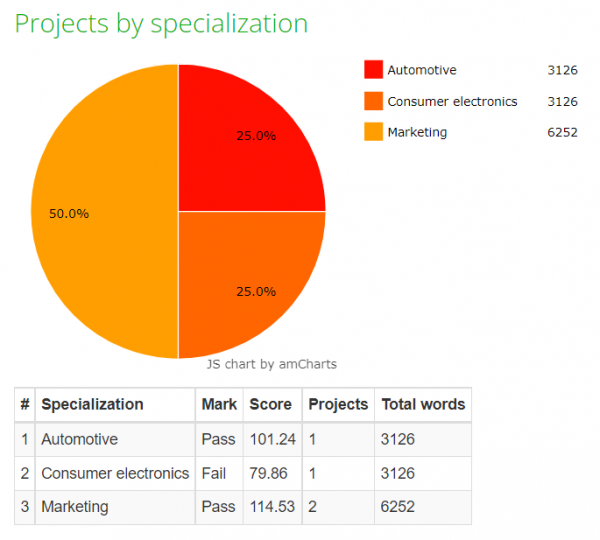
Here you can find different charts and diagrams:
- Score dynamics:
- Monthly average score dynamics:
- Managed by:
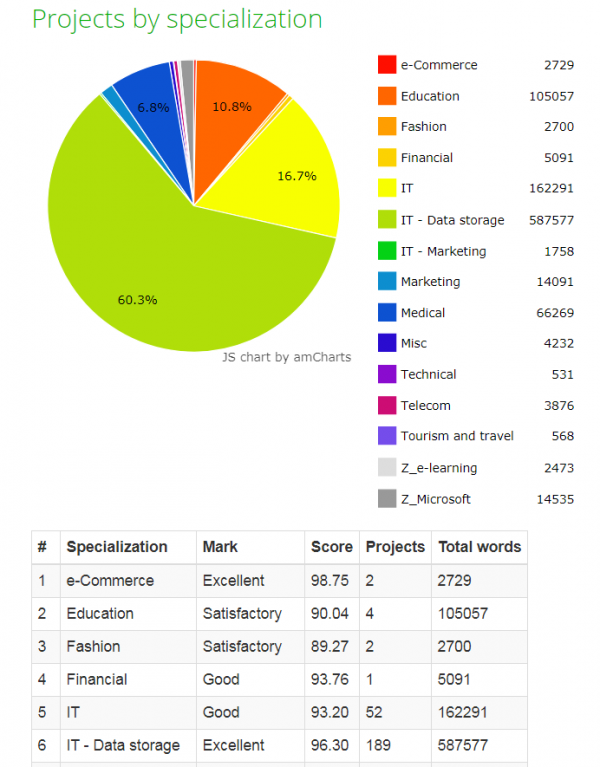
- Projects by specialization:
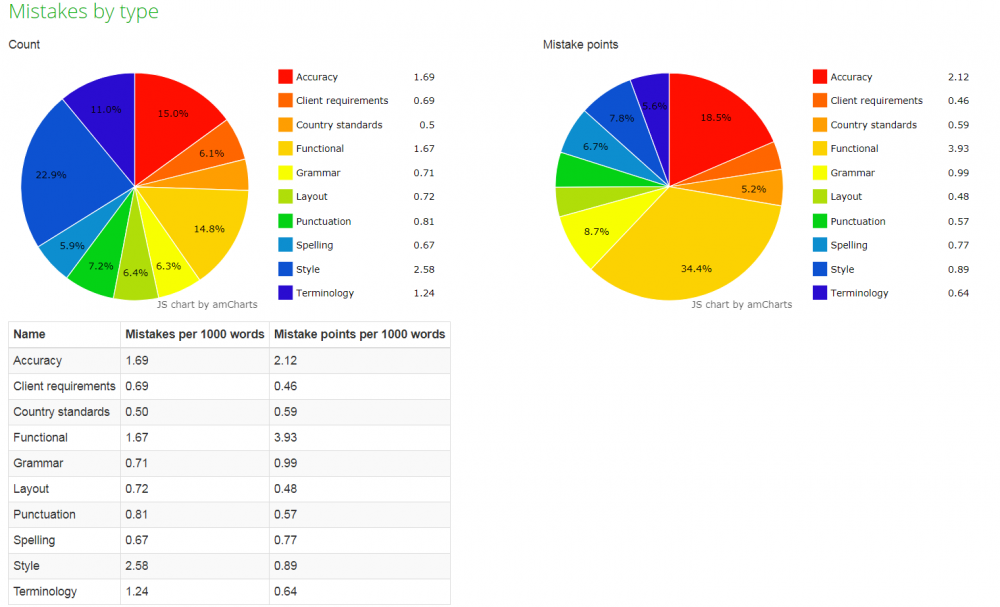
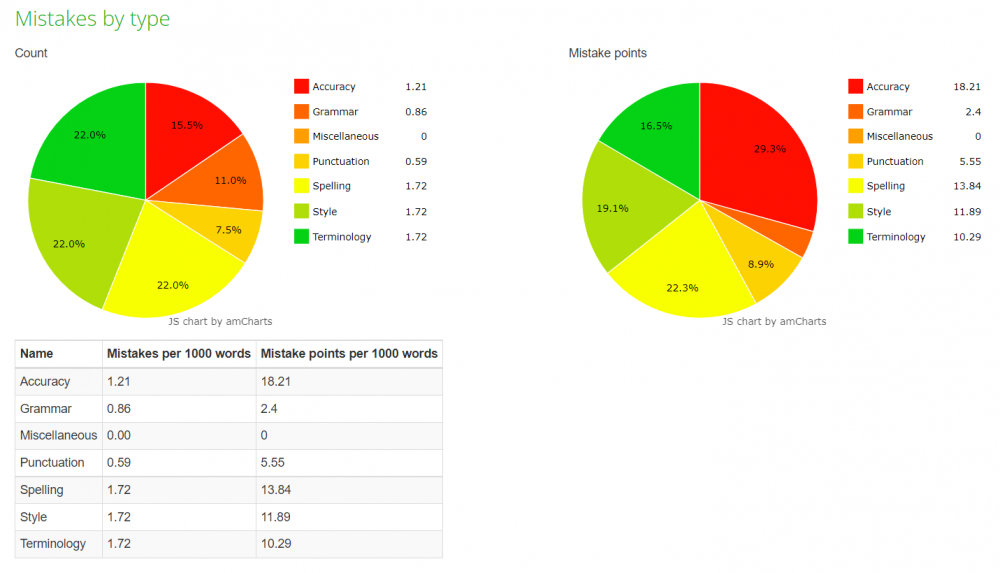
- Mistakes by type:
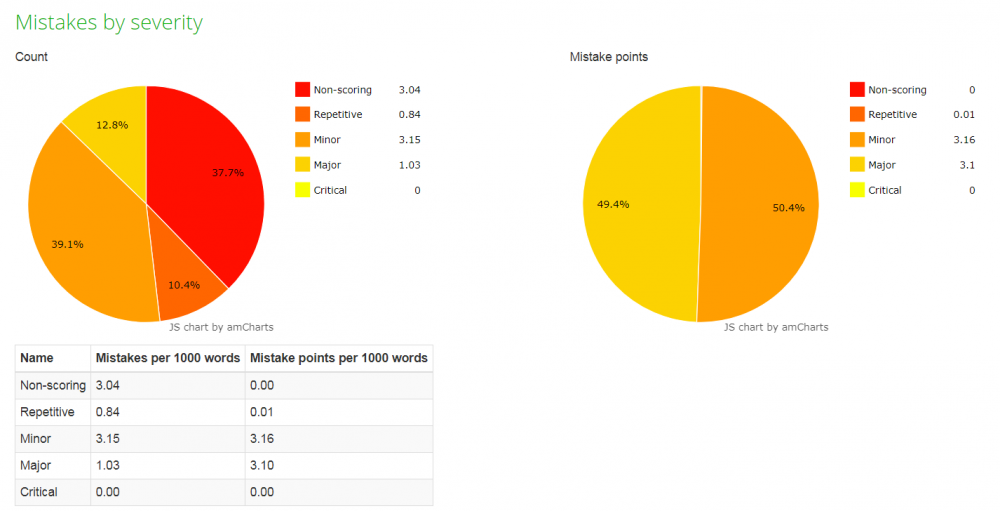
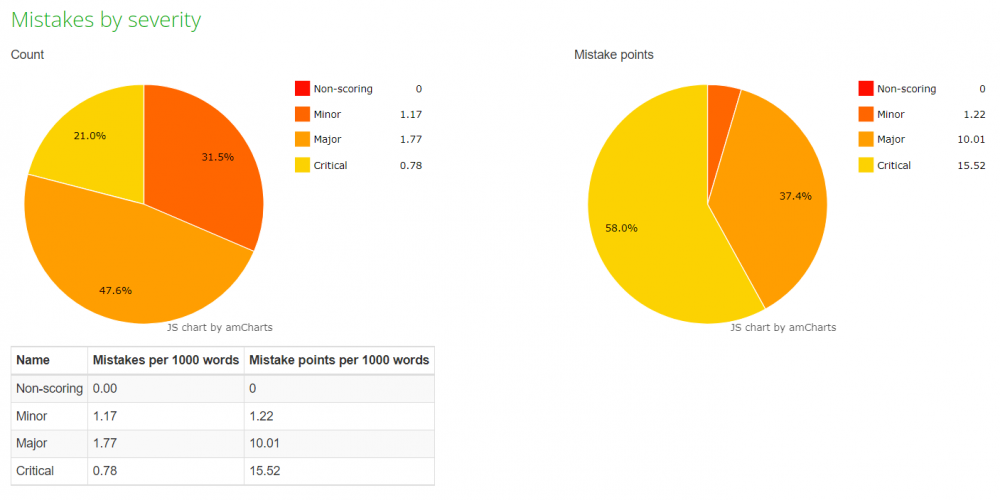
- Mistakes by severity:
Evaluator reports
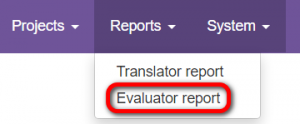
To check your evaluator reports, go to "Reports" —> "Evaluator report".
- Score dynamics:
- Monthly average score dynamics:
- Managed by:
- Projects by specialization:
- Mistakes by type:
- Mistakes by severity:
Filters
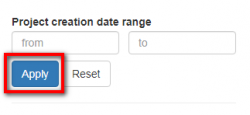
Уou can specify the project creation date range using the filter:
Quality standard
To check the quality standard of the company you cooperate with, go to "Settings" —> "Quality standard".
Here you can find:
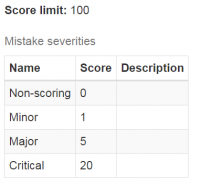
- Score limit and mistake severities:
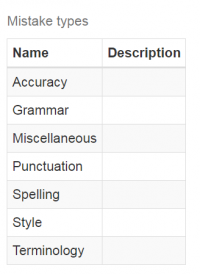
- Mistake types:
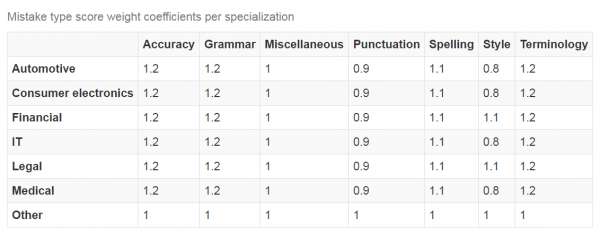
- Mistake type score weight coefficients per specialization:
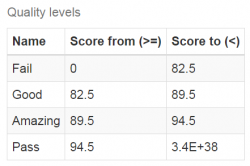
- Quality levels

