Difference between revisions of "Users creation"
From TQAuditor Wiki
| (4 intermediate revisions by 2 users not shown) | |||
| Line 1: | Line 1: | ||
You can add users manually, one by one, or import their list from an Excel file. | You can add users manually, one by one, or import their list from an Excel file. | ||
| − | 1. To add a new user manually, go to <span style="background-color:yellow"> <U> [https://cloud.tqauditor.com/user/create '''Users | + | 1. To add a new user manually, go to <span style="background-color:yellow"> <U> [https://cloud.tqauditor.com/user/create '''Users → New user'''] </U> </span>, enter user info, and click "'''Create'''": |
| − | [[ | + | [[File:Add users.png|border|190px]] |
The system will send a confirmation e-mail to just created user. | The system will send a confirmation e-mail to just created user. | ||
| Line 9: | Line 9: | ||
The user must confirm registration. | The user must confirm registration. | ||
| − | 2. To import many users at once, go to <span style="background-color:yellow"> <U> [https://cloud.tqauditor.com/user/import '''Users | + | 2. To import many users at once, go to <span style="background-color:yellow"> <U> [https://cloud.tqauditor.com/user/import '''Users → Import from Excel'''] </U> </span>, enter user info, and click "'''Create'''": |
| − | |||
| − | |||
In this case, you’ll need to download the template, fill it with users' data and upload it to the system. | In this case, you’ll need to download the template, fill it with users' data and upload it to the system. | ||
| − | <span style="color: | + | :<span style="color:orange"> '''Note:'''</span> There are 4 types of users with different '''<U>[[New user#System role|roles in the system]]</U>''': |
| − | * | + | *'''Translator''' |
| − | * | + | *'''Evaluator''' |
| − | * | + | *'''Manager''' |
| − | * | + | *'''Administrator''' |
For more detailed information on users, their system roles etc., please see our '''<U>[[Users| '''wiki pages''']]</U>''' or view a video tutorial [[File:Youtube.jpg|40px|link=https://youtu.be/3z9sH3p0bzo]] | For more detailed information on users, their system roles etc., please see our '''<U>[[Users| '''wiki pages''']]</U>''' or view a video tutorial [[File:Youtube.jpg|40px|link=https://youtu.be/3z9sH3p0bzo]] | ||
[[File:Redirect.jpg|40px|link=Quick start guide to TQAuditor]] Back to the '''Quick Start Guide''' main page | [[File:Redirect.jpg|40px|link=Quick start guide to TQAuditor]] Back to the '''Quick Start Guide''' main page | ||
Latest revision as of 16:08, 12 July 2022
You can add users manually, one by one, or import their list from an Excel file.
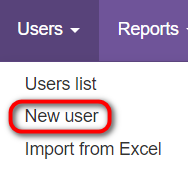
1. To add a new user manually, go to Users → New user , enter user info, and click "Create":
The system will send a confirmation e-mail to just created user.
The user must confirm registration.
2. To import many users at once, go to Users → Import from Excel , enter user info, and click "Create":
In this case, you’ll need to download the template, fill it with users' data and upload it to the system.
- Note: There are 4 types of users with different roles in the system:
- Translator
- Evaluator
- Manager
- Administrator
For more detailed information on users, their system roles etc., please see our wiki pages or view a video tutorial ![]()
