Difference between revisions of "New user"
Aleksandra.d (talk | contribs) |
|||
| Line 1: | Line 1: | ||
''New user page: [http://cloud.tqauditor.com/user/create/ http://cloud.tqauditor.com/user/create]'' | ''New user page: [http://cloud.tqauditor.com/user/create/ http://cloud.tqauditor.com/user/create]'' | ||
---- | ---- | ||
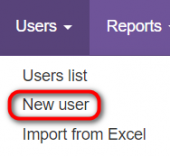
| + | 1. To add a new user, go to '''Users → New user''': | ||
| + | [[File:Add users.png|border|170px]] | ||
| − | + | 2. Fill in all the fields and press the "'''Create'''" button: | |
| − | [[File: | + | [[File:Eva apple.png|border|170px]] |
| − | <span style="color: | + | <span style="color:red"> '''Note''': </span> Only users with the marked '''"Can log in"''' checkbox can register, work in the system and get corresponding notifications. |
| − | + | The system will send a confirmation e-mail to the created user. | |
| − | |||
| − | |||
| − | |||
| − | The system will send a confirmation e-mail to | ||
When registration confirmed, you will see date and time in the '''Registered at''' column. | When registration confirmed, you will see date and time in the '''Registered at''' column. | ||
Revision as of 14:41, 9 April 2020
New user page: http://cloud.tqauditor.com/user/create
1. To add a new user, go to Users → New user:
2. Fill in all the fields and press the "Create" button:
Note: Only users with the marked "Can log in" checkbox can register, work in the system and get corresponding notifications.
The system will send a confirmation e-mail to the created user.
When registration confirmed, you will see date and time in the Registered at column.
You may also Edit user details or Resend invitation (for this, click on the required user ID).
System role
There are 4 types of users with different roles in the system:
1. Translator role allows to:
- View the reports about made corrections and the evaluated translations made by that translator.
- Add comments about the corrections and send the project for reevaluation.
- View statistical reports about translations quality for that translator.
2. Evaluator role allows to:
- Do the same actions as Translator (described above).
- Compare the files to generate the report of corrections.
- Classify each correction by mistake type and severity.
- View statistical reports about evaluations for that evaluator.
3. Manager role allows to:
- Do the same actions as Evaluator (described above).
- Create and launch evaluation projects.
- Assign and change different project participants.
- Edit general information about the project.
- View statistical reports about the work of translators and evaluators.
4. Administrator role allows to:
- Do the same actions as Manager (described above).
- Add, edit and remove users.
- Define quality standards (e.g. mistake types, scores and quality levels).
- Edit system settings.
- Send messages to users.
![]() Back to the table of contents.
Back to the table of contents.
New user creation rules
1. A new user can be created by the user with the following roles:
- Account owner
- Administrator
- Manager
2. The user can create a new user only with a role below his own:
- Account owner—can create users with any role.
- Administrator—can create users with Manager, Evaluator and Translator roles.
- Manager—can create users with Evaluator and Translator roles.
- Evaluator and Translator—can’t create users.
3. The import from Excel option allows to create users with any roles, so this feature is available only for the Account owner.

